# VS Code 常用操作
# 常用配置
Vistual Studio Code (opens new window)是一款由微软开发且跨平台的免费源代码编辑器。该软件支持语法高亮、代码自动补全(又称IntelliSense)、代码重构、查看定义功能,并且内置了命令行工具和Git版本控制系统。用户可以更改主题和键盘快捷方式实现个性化设置,也可以通过内置的扩展程序商店安装扩展以拓展软件功能。
# 配置不自动更新
[文件]->[首选项]->[设置], 进入设置页面, 搜索"update", 将Update: Enable Windows Background Updates(windows 后台更新)设为false, 将Update: Mode(更新模式)设置为none.
# 配置连字
下载并安装FiraCode 字体 (opens new window), 在[设置]中搜索"font", 配置Editor: Font Family(编辑器字体)设为Fira Code, Consolas, Microsoft YaHei, editor.fontLigatures(编辑器连字)设为true. 用户配置在C:\Users\${用户名}\AppData\Roaming\Code\User下的settings.json文件中, 典型项如下:
{
  "update.mode": "none",
  "workbench.iconTheme": "material-icon-theme",
  "editor.minimap.enabled": false,
  "editor.renderWhitespace": "none",
  "editor.fontFamily": "Fira Code, Consolas, Microsoft YaHei",
  "editor.fontLigatures": true,
  "workbench.colorTheme": "Visual Studio Dark",
  "update.enableWindowsBackgroundUpdates": false
}
# 修改vscode默认markdown预览样式
默认markdown的显示效果一般,标题前面没有形“1.1,2.1”的标号,首行也不空2格等问题,为了修改默认预览样式,可以在项目根目录增加文件markdown_preview.css,文件内容如下:
body {
  -ms-text-size-adjust: 100%;
  -webkit-text-size-adjust: 100%;
  line-height: 1.5;
  background-color: rgb(248, 248, 248);
  color: #333;
  font-size: 18px;
  font-family: "Source Code Pro", Consolas, Menlo, Monaco, "Courier New", monospace, "FZSSJW", "方正书宋简体", "Microsoft YaHei", "Helvetica Neue", Helvetica, Arial, sans-serif;
}

code{
font-family: '楷体';
background-color: rgb(248, 248, 248);
font-size: 1.05em !important;
color: #333;
}

p {
text-indent: 2em;
font-weight: 400;
line-height: 1.5;
color: #000;
margin: 0.6em 0;

}

h1 {
text-align: center;
font-family: "方正小标宋简体", Consolas, Menlo, Monaco, "Courier New", monospace, "FZSSJW", "方正书宋简体", "Microsoft YaHei", "Helvetica Neue", Helvetica, Arial, sans-serif;
font-weight: 700;
}

h2,
h3,
h4,
h5,
h6 {
font-weight: 700;
margin: 1em 0 0 0;
padding: 0;
font-family: -apple-system, BlinkMacSystemFont, "Apple Color Emoji", "PingFang SC", "Hiragino Sans GB", "Microsoft YaHei", "Helvetica Neue", Helvetica, Arial, sans-serif;
}

h1 {
  counter-reset: h2;
}

h2 {
  counter-reset: h3;
}

h3 {
  counter-reset: h4;
}

h4 {
  counter-reset: h5;
}

h2:before {
  counter-increment: h2;
  content: counter(h2) " "
}

h3:before {
  counter-increment: h3;
  content: counter(h2)"." counter(h3) " "
}

h3:before {
  counter-increment: h3;
  content: counter(h2)"." counter(h3) " "
}

h4:before {
  counter-increment: h4;
  content: counter(h2)"." counter(h3) "." counter(h4) " "
}

h5:before {
  counter-increment: h5;
  content: "(" counter(h5) ")"
}
然后在vscode的设置中,Markdown: Styles部分增加markdown_preview.css即可生效,如下图所示。

# 实用插件
VScode的插件功能 (opens new window)十分强大,既可以在VScode中搜索下载,也可以下载离线版本,下面记录一些实用插件。
# LiveServer
插件名称为ritwickdey.LiveServer,启动具有实时重新加载功能的本地开发服务器,以处理静态和动态页面。使用方法如下:
方式1:打开一个项目,单击状态栏的Go Live以打开/关闭服务器。

方式2:右键单击资源管理器窗口中的.HTML文件,然后单击Open with Live Server。
方式3:打开一个HTML文件,右键单击编辑器,然后单击Open with Live Server。
支持的功能有:
- 快速开发静态服务器,支持实时热加载。
- 通过从状态栏单击来启动或停止服务器。
- 从资源管理器菜单打开
.HTML文件到浏览器。 - 可自定义的端口号,服务器根目录,默认浏览器。
# Debugger for Chrome
插件名称为msjsdiag.debugger-for-chrome,可在在Chrome浏览器或任何其他支持Chrome Debugger协议的目标中调试JavaScript代码。使用方式:
配置:Debugger for Chrome以两种模式运行:一是在Chrome浏览器上运行(launch)实例,二是将其附加(attach)到现有的Chrome实例上。就像使用Node调试器一样,您可以在项目的根目录中使用文件.vscode/launch.json配置这些模式。
方式1-Launch(启动):使用"request": "launch",这时必须指定file或url以针对本地文件或URL启动Chrome,launch.json中的实例如下:
{
    "version": "0.1.0",
    "configurations": [
        {
            "name": "Launch localhost",
            "type": "chrome",
            "request": "launch",
            "url": "http://localhost/mypage.html",
            "webRoot": "${workspaceFolder}/wwwroot"
        },
        {
            "name": "Launch index.html",
            "type": "chrome",
            "request": "launch",
            "file": "${workspaceFolder}/index.html"
        },
        {
            "type": "chrome",
            "request": "launch",
            "name": "在chrome中调试当前文件",
            "file": "${file}"
        }
    ]
}
方式2-Attach(附加):使用"request": "launch",必须在启用了远程调试的情况下启动Chrome,才能将扩展程序附加到它。
在windows中启动chrome调试的设置方式如下。右键单击Chrome快捷方式,选择属性,在“目标”字段中,附加--remote-debugging-port=9222后运行。或者在命令提示符下执行 <path to chrome>/chrome.exe --remote-debugging-port=9222。
launch.json“附加”配置的示例文件如下:
{
    "version": "0.1.0",
    "configurations": [
        {
            "name": "Attach to url with files served from ./out",
            "type": "chrome",
            "request": "attach",
            "port": 9222,
            "url": "<url of the open browser tab to connect to>",
            "webRoot": "${workspaceFolder}/out"
        }
    ]
}
支持的功能有:
- 设置断点,在vscode中设置断点即可,支持包括在启用源映射时在源文件中的断点
- 步进,包括Chrome浏览器上的按钮
- 监听变量
- Console控制台
# Tiny Light
插件名称为luqimin.tiny-light,柔和的绿色主题,对眼睛很好,主题预览如下。

使用方法如下:点击文件, 首选项,颜色主题,在浅色主题下选择Tiny Light即可。
# Todo Tree
插件名称为Gruntfuggly.todo-tree,这个插件可以快速在工作空间中搜索注释标签(例如TODO和FIXME),并将其显示在资源管理器窗格的树状视图中。单击树中的TODO将打开文件,并将光标放在包含TODO的行上。
# Markdown Paste
插件全称为telesoho.vscode-markdown-paste-image (opens new window),下载地址为vscode-markdown-paste-image (opens new window),由国人开发,如果复制图片,然后在VS code中按下快捷键Ctrl+Alt+V,会触发插件的智能粘贴功能,然后弹出对话框,询问用户文件名应该是什么,然后将其自动插入到指定位置,操作过程如下图所示。

在插件设置中的Markdown Paste:Path中能修改图片默认保存位置。例如在项目MarkdownPaper中,可以将其修改为./static/,如下图所示。

# 常用快捷键
- 放大缩小整个编辑器, 默认快捷键是
ctrl+=和ctrl+- - 显示命令窗口:
ctrl+shift+p - 快速打开文件:
ctrl+shift+p - 进入设置页面:
ctrl+,, (搜狗输入法默认切换跟该快捷键冲突, 建议进入搜狗输入法的输入法管理页面, 建议修改为ctrl+backspace)

# 快捷键配置
因为之前一直使用 eclipse, 惯用的快捷键设置如下, 替换C:\Users\${用户名}\AppData\Roaming\Code\User下的keybindings.json文件内容.
[
  // 删除整行 ctrl+d
  {
    "key": "ctrl+d",
    "command": "editor.action.deleteLines",
    "when": "editorTextFocus && !editorReadonly"
  },
  // 向上复制行 ctrl+alt+up
  {
    "key": "ctrl+alt+up",
    "command": "editor.action.copyLinesUpAction",
    "when": "editorTextFocus && !editorReadonly"
  },
  // 向下复制行 ctrl+alt+down
  {
    "key": "ctrl+alt+down",
    "command": "editor.action.copyLinesDownAction",
    "when": "editorTextFocus && !editorReadonly"
  },
  // 上一个编辑点 ctrl+q
  {
    "key": "ctrl+q",
    "command": "editor.emmet.action.prevEditPoint"
  },
  // 向下换行 shift+enter
  {
    "key": "shift+enter",
    "command": "editor.action.insertLineAfter",
    "when": "editorTextFocus && !editorReadonly"
  },
  // 格式化选中文本 ctrl+alt+l
  {
    "key": "ctrl+alt+l",
    "command": "editor.action.formatSelection",
    "when": "editorHasSelection && editorTextFocus && !editorReadonly"
  },
  // 向下增加光标 shift+alt+down
  {
    "key": "shift+alt+down",
    "command": "editor.action.insertCursorBelow",
    "when": "editorTextFocus"
  },
  // 向上增加光标 shift+alt+up
  {
    "key": "shift+alt+up",
    "command": "editor.action.insertCursorAbove",
    "when": "editorTextFocus"
  },
  // 给下一个选中变量增加光标 ctrl+e
  {
    "key": "ctrl+e",
    "command": "editor.action.addSelectionToNextFindMatch",
    "when": "editorFocus"
  },
  // 代码智能提醒 alt+/
  {
    "key": "alt+oem_2",
    "command": "editor.action.triggerSuggest",
    "when": "editorHasCompletionItemProvider && editorTextFocus && !editorReadonly"
  },
  // 运行任务,crtl+shift+B
  {
    "key": "ctrl+shift+b",
    "command": "workbench.action.tasks.runTask"
  },
  {
    "key": "f5",
    "command": "-extension.run",
    "when": "editorTextFocus"
  }
]
# vscode 的 markdown 增强
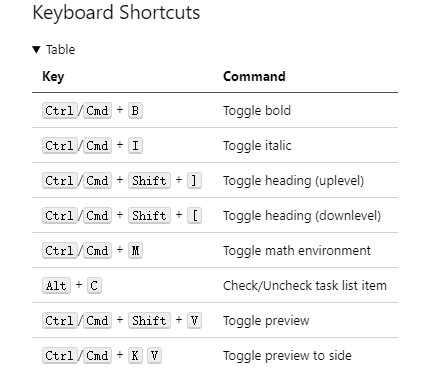
markdown ALL in One安装后使用默认配置就可以, 提供了自动完成和预览功能, 快捷键列表如下:
# ts 实战中的部分设置
(1) 默认使用单引号: 在设置中搜索quote, 在Quote Style中选择single.
(2) 代码缩进为 2 个空格: 在设置中搜索tab, 在Tab Size中设置为2.
(3) 代码自动格式化: 在扩展中搜索并安装prettier, 在设置中搜索format on save, 启用后保存文件会自动格式化代码.

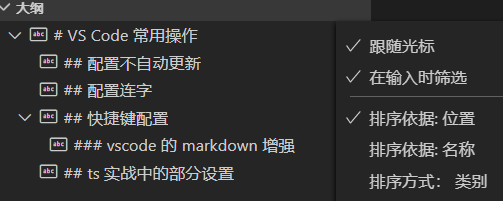
(4) 大纲按照文件位置进行排序: 大纲默认按照"类别"进行排序, 可点击[大纲]左侧的...("更多操作"), 选择"排序依据: 位置"即可.
(5) 在 js 中启用 emmet: 在设置中查找Exclude Languages, 修改setting.json文件, 增加"emmet.includeLanguages": { "javascript": "javascriptreact" }
← Katex/Latex 公式速查 搭建指南 →